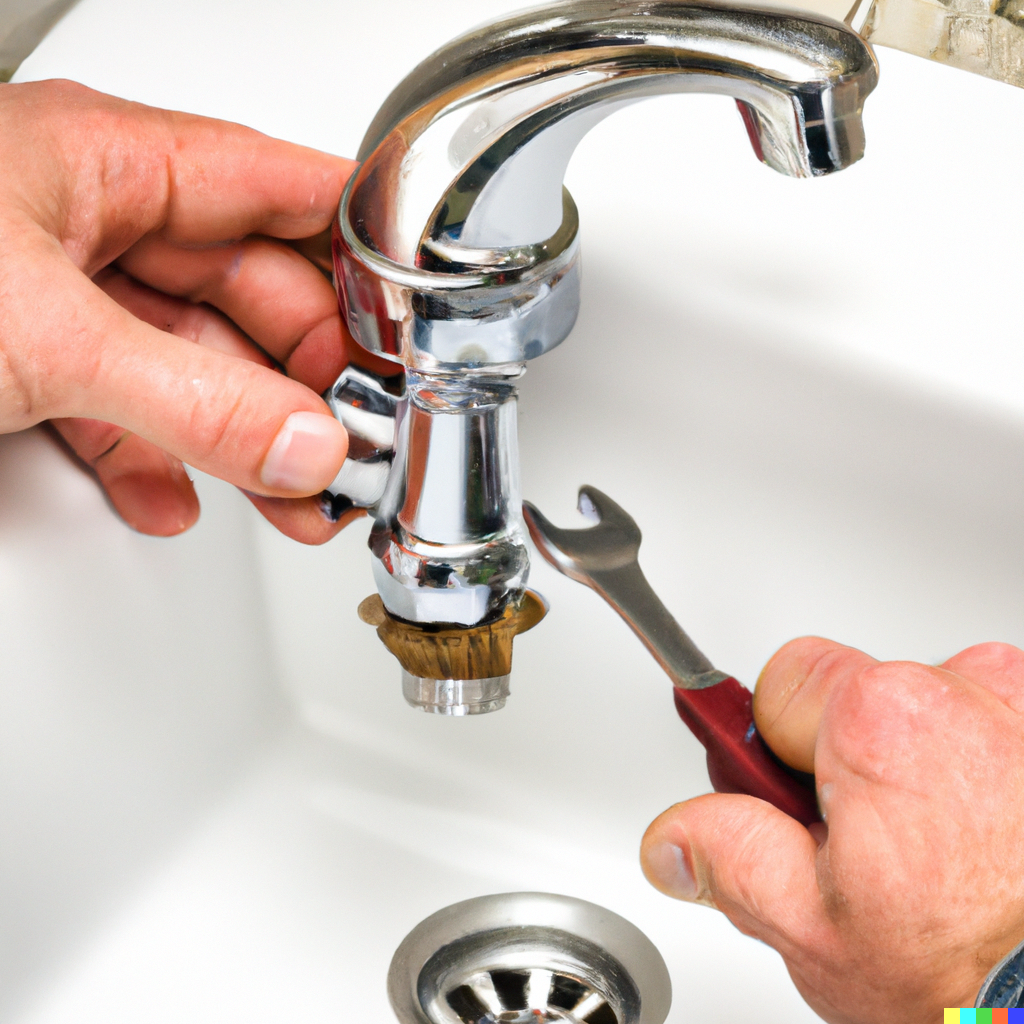
How To Fix Leaky Bathroom Faucet?
By Abu Rizal at: December 24, 2022
Is your single handle bathroom faucet constantly dripping, no matter how hard you try to stop it? Don't worry, you're not alone.
Leaky faucets are a common problem after years of regular use. But the good news is that fixing a leaky single handle faucet isn't too difficult, especially if you have a repair kit on hand.
These kits usually include all the parts you'll need to make the repair
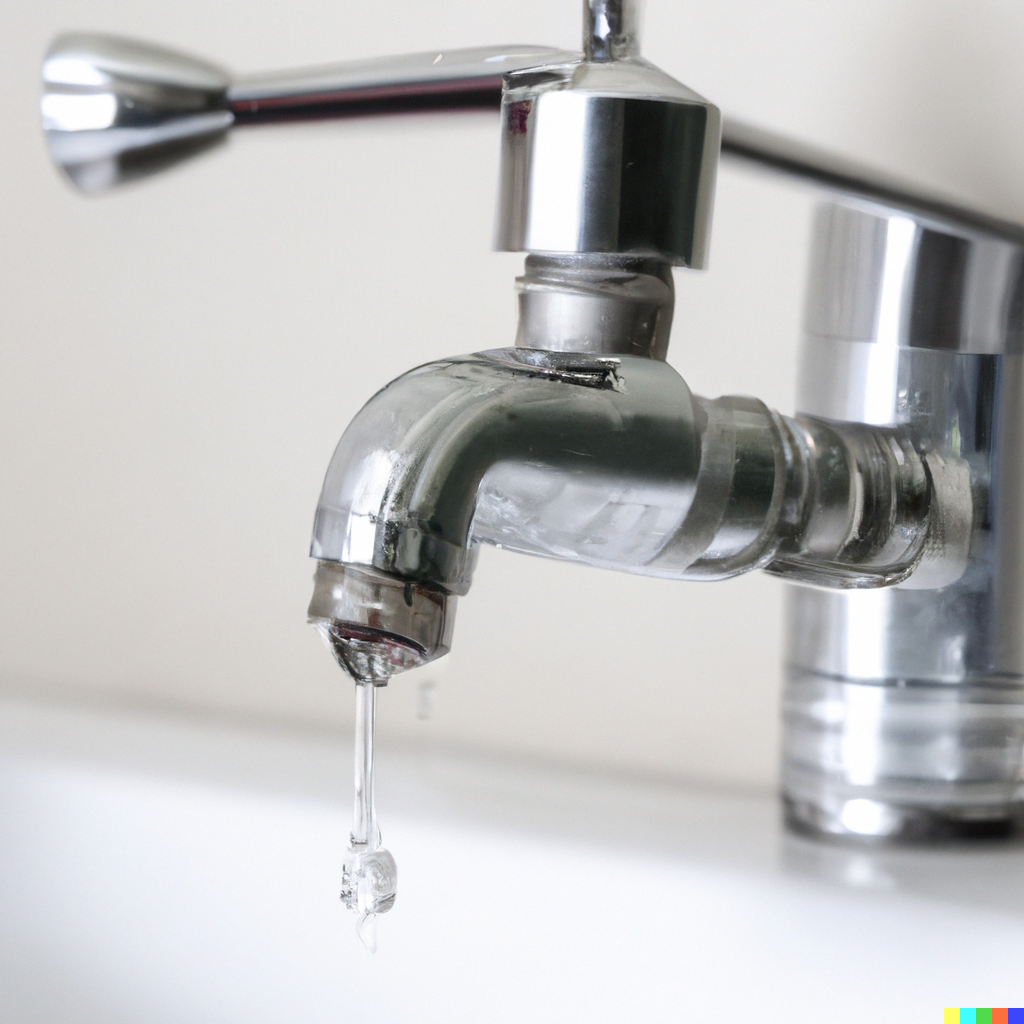
 To determine the cause of a leaky faucet, it is important to first determine whether the leak is coming from cold water, hot water, or a combination of both.
To do this, you can try fiddling with the faucet handle to see if the leak occurs on both sides or just one.
If the leak is only coming from one side, it may be possible to fix the issue by simply tightening the valves on that side of the faucet.
However, if the leak is coming from both sides or you are unable to determine the source of the leak, it may be necessary to seek professional assistance.
Button faucets are a type of sink faucet that do not have traditional handles, but rather, are controlled by pressing buttons to turn the water on and off.
These types of faucets can be convenient and easy to use, especially for those who may have difficulty grasping or turning traditional handles.
Some button faucets also come equipped with a retractable hose, which can be useful for washing large or oddly-shaped dishes.
While button faucets may take some getting used to, their simplicity and versatility make them a popular choice among homeowners.
These types of faucets are the easiest to install and operate, as they only have one handle that controls the water temperature.
To adjust the temperature, simply turn the handle to the left for cold water, to the right for hot water, or straight up for a lukewarm temperature.
Single-handle faucets are a practical and straightforward option for those looking to update their plumbing fixtures.
These faucets are equipped with a proximity sensor that turns on the water when it detects movement in front of it
These faucets typically have two separate valves for controlling the hot and cold water, as opposed to a single handle faucet
To help clarify, here is a brief overview of the inner mechanisms used in faucets
These faucets are known for their reliability due to their simple design, which includes only one moving part.
For added durability, consider purchasing a ball faucet with a metal ball.
These faucets are known for their reliability due to their lack of moving parts.
For added durability, consider purchasing a brass cartridge faucet.
They are designed to be more durable and easier to use than traditional compression faucets, which rely on rubber washers to control the flow of water.
It contains small ports and channels that allow water to flow through when the handle is turned on.
The cartridge also has a temperature control element, such as a wax pellet or ceramic disc, that expands or contracts based on the temperature of the water.
This allows the user to easily adjust the temperature of the water by turning the handle.
Single-handle faucets have one handle that controls the flow and temperature of water, while double-handle faucets have separate handles for the hot and cold water.
Thermostatic faucets have a built-in temperature control element that automatically adjusts the water temperature based on the user's settings.
These faucets use a ceramic disk cartridge to control the flow of water, rather than the more traditional rubber washer.
This makes them resistant to wear and tear, and less prone to leaks and drips.
In addition, ceramic disk faucets are easy to maintain and can last for many years with proper care.
If you're looking for a reliable and efficient faucet for your sink home, a ceramic disk faucet may be the perfect choice.
There are many different styles and finishes to choose from, ranging from traditional to modern and everything in between.
Some shower faucets feature single handles for controlling both the temperature and flow of water, while others have separate handles for each function.
It's important to consider your personal preferences and needs when selecting a shower faucet, as well as the style of your bathroom and any existing plumbing. With the right shower faucet, you can create a functional and stylish space that meets all of your needs.
Many people use a single handle faucet for their shower to control the flow of hot and cold water.
It is important to regularly maintain and potentially replace sink faucets, which are used frequently in households, to prevent leaks from occurring due to wear and tear.
By taking care of your faucets and replacing them when necessary, you can ensure that your plumbing system remains efficient and reliable.
These include ceramic disk valves, ball valves, and cartridge valves, each of which offers unique benefits and features.
The handle of a faucet is a crucial element in regulating the flow of water, and it's important to choose one that is both effective and efficient.
Whether you prefer a single handle or separate handles for hot and cold water, the design and function of the handle can make a big difference in the overall usability of your faucets.
It's important to consider the style and finish of the handle, as well as the overall design of your plumbing fixtures, when choosing a faucet handle.
With the right water flow control, you can easily and accurately regulate the temperature and flow of water in your home.
Each material has its own unique properties and benefits, and the best choice for a bathroom faucet will depend on the specific needs and preferences of the homeowner.
They are also known for their smooth operation and ease of use, as the surface of the faucet is smooth and easy to clean.
There are several types of nickel faucets available on the market, including single-handle, double-handle, and touchless options.
These faucets are suitable for a variety of different applications, such as bathroom sinks, kitchen sinks, and even outdoor faucets.
In addition to their practical benefits, nickel faucets also add a touch of sophistication and style to any home.
Whether you are looking to update the look of your bathroom or kitchen, or simply want to add a touch of luxury to your home, a nickel faucet may be the perfect choice.
So, it is a good option for those who want a durable and stylish faucet for their home.
They are made of chrome-plated brass or other materials and feature a shiny, reflective finish that is resistant to tarnishing and corrosion.
Chrome faucets are popular because of their durability, ease of maintenance, and modern aesthetic appeal.
They can be found in a variety of styles, including single-handle, double-handle, and pull-out spray models, and are available in many different design options to suit a variety of decorating tastes.
It may not have the shine of brass or chrome, but you can easily buy a zinc faucet coated in chrome for a more modern look.
If you're looking for a budget-friendly option that will still provide long-lasting performance, consider a zinc faucet for your next bathroom or kitchen upgrade.
It's important to make sure you get the right repair kit for your faucet to ensure a successful repair.
If you're not sure what kind of kit you need, you can check the manufacturer's website or consult a professional plumber for guidance.
These types of faucets use a disk-shaped valve to control the flow of water, and they are known for their durability and smooth operation.
However, like all faucets, they can eventually start to leak or become loose over time.
If you're experiencing these issues with your disk faucet, a disk faucet kit can help you repair it.
These kits typically contain a variety of parts that are specific to disk faucets, such as a new valve disk, O-rings, and mounting hardware.
By replacing the old parts with new ones, you can get your faucet working like new again.
To repair a disk faucet with a kit, you'll need to disassemble the faucet, replace the old parts with the new ones, and reassemble the faucet.
This can be a bit of a technical process, so if you're not comfortable with DIY plumbing repairs, it's a good idea to consult a professional plumber for assistance.
These types of faucets use a ball-shaped valve to control the flow of water, and they are known for their durability and smooth operation.
However, like all faucets, they can eventually start to leak or become loose over time.
If you're experiencing these issues with your ball faucet, a ball faucet kit can help you repair it.
These kits typically contain a variety of parts that are specific to ball faucets, such as a new ball valve, seals, and a replacement spout.
By replacing the old parts with new ones, you can get your faucet working like new again.
To repair a ball faucet with a kit, you'll need to disassemble the faucet, replace the old parts with the new ones, and reassemble the faucet.
This can be a bit of a technical process, so if you're not comfortable with DIY plumbing repairs, it's a good idea to consult a professional plumber for assistance.
These may vary slightly depending on the specific make and model of your faucet and the type of repair you need to perform, but in general, you'll need:
It's a good idea to gather all of the necessary tools and supplies before you start the repair, as this will help ensure that you have everything you need to complete the job.
This can potentially save you money and extend the lifespan of your current faucet. If cleaning the faucet does not solve the issue, it may be necessary to invest in a new one.
Here are some 7 steps you can follow to clean a leaky faucet:
To learn how to access and potentially clean internal parts that may be causing clogs in your sink, continue reading for instructions on how to dismantle the sink.
 It's definitely frustrating to have a leaky faucet, and it can also be a waste of water and money if left unrepaired.
However, with a few tools and some basic knowledge, you can often fix a leaky faucet yourself. Here's a general overview of the steps you can take to repair a single handle faucet:
Keep In Mind That Every Faucet Is Different, so you may need to adapt these steps slightly depending on the specific model you are working with. If you are unsure about how to proceed, it may be a good idea to consult the manufacturer's instructions or seek the help of a professional plumber.
The specific installation instructions may vary depending on the type of faucet you are installing, so be sure to refer to the manufacturer's manual for guidance.
Once you have everything you need, you can start the installation process.
Here are some specific things you should check before testing the faucet:
Once you have checked all of these things, you can turn on the water supply and test the faucet to verify that it is functioning properly. If you notice any issues, make the necessary adjustments to fix them before using the faucet.
Here are a few additional tips to keep in mind when installing a new cartridge sink:
By following these tips, you can ensure that your new cartridge sink is installed properly and functioning correctly.
Here are a few additional tips to consider:
 If the shower faucet in your home is leaking and needs to be replaced, here are the steps you can take to do it:
It's important to follow the manufacturer's instructions for your specific faucet model, as the process may vary slightly.
If you are not comfortable with this type of work, it may be best to hire a professional plumber to handle the installation for you.
Here are a few steps to take after completing a faucet repair or installation:
 Check for any remaining leaks by running the faucet for a few minutes and looking for any dripping or pooling water.
It is also a good idea to keep a record of the repair, including the parts that were used and any steps taken during the repair process.
This can be helpful if you need to refer back to the repair in the future or if you need to show proof of the repair to a warranty provider.
Here are some things to consider when planning a bathroom remodel:
By taking the time to plan and carefully consider your options, you can create a bathroom that meets your needs and adds value to your home.
It is always a good idea to follow the manufacturer's instructions and use caution when working on plumbing projects.
If you are unsure of how to proceed or if you are uncomfortable attempting the repair on your own, it is best to consult a professional plumber.
Leaky faucets are a common problem after years of regular use. But the good news is that fixing a leaky single handle faucet isn't too difficult, especially if you have a repair kit on hand.
These kits usually include all the parts you'll need to make the repair
Different Types Of Leaks That Can Occur

To do this, you can try fiddling with the faucet handle to see if the leak occurs on both sides or just one.
If the leak is only coming from one side, it may be possible to fix the issue by simply tightening the valves on that side of the faucet.
However, if the leak is coming from both sides or you are unable to determine the source of the leak, it may be necessary to seek professional assistance.
Types of Bathroom Faucets
Many of the button faucets feature a retractable hose to allow for maximum use when washing those awkward-sized dishes.Button faucets are a type of sink faucet that do not have traditional handles, but rather, are controlled by pressing buttons to turn the water on and off.
These types of faucets can be convenient and easy to use, especially for those who may have difficulty grasping or turning traditional handles.
Some button faucets also come equipped with a retractable hose, which can be useful for washing large or oddly-shaped dishes.
While button faucets may take some getting used to, their simplicity and versatility make them a popular choice among homeowners.
Single-Handle Faucet
If you prefer to keep the same style of faucet in your kitchen or bathroom, consider purchasing a single-handle faucet.These types of faucets are the easiest to install and operate, as they only have one handle that controls the water temperature.
To adjust the temperature, simply turn the handle to the left for cold water, to the right for hot water, or straight up for a lukewarm temperature.
Single-handle faucets are a practical and straightforward option for those looking to update their plumbing fixtures.
Touch-less Faucet
Consider purchasing a touchless faucet if you want the convenience of hands-free operation.These faucets are equipped with a proximity sensor that turns on the water when it detects movement in front of it
Wall-Mounted Faucet: A Practical and Stylish Choice for Your Bathroom
A wall-mounted faucet is a type of faucet that is mounted on the wall rather than on the bathroom sink counter, similar to many shower faucets.These faucets typically have two separate valves for controlling the hot and cold water, as opposed to a single handle faucet
Exploring the Different Inner-Valve Types of Sink Faucets
With so many brands and types of faucets to choose from, such as Delta, Moen, and Kohler, it can be difficult to understand the differences between them.To help clarify, here is a brief overview of the inner mechanisms used in faucets
Understanding the Inner Mechanics of Ball Faucets
> Ball faucets, also known as washerless faucets, are a type of sink faucet that uses an inner valve regulated by a rotating plastic or metal ball to control water flow.These faucets are known for their reliability due to their simple design, which includes only one moving part.
For added durability, consider purchasing a ball faucet with a metal ball.
Cartridge Faucets: A Comprehensive Guide
A cartridge faucet uses an o-ring, located inside a cylindrical cartridge, to control the flow of water.These faucets are known for their reliability due to their lack of moving parts.
For added durability, consider purchasing a brass cartridge faucet.
What are Cartridge Faucets?
> Cartridge faucets are a type of plumbing fixture that utilizes a cartridge valve to control the flow and temperature of water.They are designed to be more durable and easier to use than traditional compression faucets, which rely on rubber washers to control the flow of water.
How do Cartridge Faucets Work?
Cartridge faucets work by using a cartridge valve to control the flow and temperature of water. The cartridge is a cylindrical piece of plastic or metal that is located inside the faucet handle.It contains small ports and channels that allow water to flow through when the handle is turned on.
The cartridge also has a temperature control element, such as a wax pellet or ceramic disc, that expands or contracts based on the temperature of the water.
This allows the user to easily adjust the temperature of the water by turning the handle.
What are The Benefits of Cartridge Faucets?
There are several benefits to using cartridge faucets:- Durability: Cartridge faucets are known for their durability and long lifespan. They are less prone to wear and tear than traditional compression faucets, which can develop leaks over time due to the rubber washers wearing out.
- Easy maintenance: Cartridge faucets are easy to maintain and repair. If a cartridge faucet starts to leak or become difficult to turn, it is usually a simple matter to replace the cartridge. This can be done without the need for specialized tools or a professional plumber.
- Ease of use: Cartridge faucets are easy to use and provide precise control over the flow and temperature of water. The handle moves smoothly and requires minimal effort to turn on and off.
What types of cartridge faucets are available?
There are several types of cartridge faucets available, including single-handle, double-handle, and thermostatic faucets.Single-handle faucets have one handle that controls the flow and temperature of water, while double-handle faucets have separate handles for the hot and cold water.
Thermostatic faucets have a built-in temperature control element that automatically adjusts the water temperature based on the user's settings.
How do I Choose the Right Cartridge Faucet for My Home?
When choosing a cartridge faucet for your home, consider the following factors:- Style: Choose a faucet that complements the style of your kitchen or bathroom.
- Finish: Choose a finish that matches the other fixtures in your home.
Popular finishes include chrome, stainless steel, and brushed nickel. - Mounting: Choose a faucet that is designed for the type of sink you have.
For example, if you have a vessel sink, you will need a faucet with a tall spout to reach over the edge of the sink. - Flow rate: Consider the flow rate of the faucet, which is measured in gallons per minute (GPM).
A faucet with a higher flow rate will provide a stronger stream of water, but it may also use more water. - Price: Determine your budget and choose a faucet that fits within it. Cartridge faucets range in price from around $50 to several hundred dollars.
Ceramic Disk Faucets: A Durable and Long-Lasting Choice for Your Home
Ceramic disk faucets are a popular choice for homeowners looking for a durable and long-lasting option for their plumbing fixtures.These faucets use a ceramic disk cartridge to control the flow of water, rather than the more traditional rubber washer.
This makes them resistant to wear and tear, and less prone to leaks and drips.
In addition, ceramic disk faucets are easy to maintain and can last for many years with proper care.
If you're looking for a reliable and efficient faucet for your sink home, a ceramic disk faucet may be the perfect choice.
Shower Faucets: Choosing the Right Style and Functionality for Your Bathroom
Shower faucets are an essential part of any bathroom, and choosing the right one can make a big difference in the overall look and functionality of your space.There are many different styles and finishes to choose from, ranging from traditional to modern and everything in between.
Some shower faucets feature single handles for controlling both the temperature and flow of water, while others have separate handles for each function.
It's important to consider your personal preferences and needs when selecting a shower faucet, as well as the style of your bathroom and any existing plumbing. With the right shower faucet, you can create a functional and stylish space that meets all of your needs.
Many people use a single handle faucet for their shower to control the flow of hot and cold water.
It is important to regularly maintain and potentially replace sink faucets, which are used frequently in households, to prevent leaks from occurring due to wear and tear.
By taking care of your faucets and replacing them when necessary, you can ensure that your plumbing system remains efficient and reliable.
Water Flow Controls: The Importance of Choosing the Right Faucet Handle
There are various types of valves that can be used to control the flow of water to a sink.These include ceramic disk valves, ball valves, and cartridge valves, each of which offers unique benefits and features.
The handle of a faucet is a crucial element in regulating the flow of water, and it's important to choose one that is both effective and efficient.
Whether you prefer a single handle or separate handles for hot and cold water, the design and function of the handle can make a big difference in the overall usability of your faucets.
It's important to consider the style and finish of the handle, as well as the overall design of your plumbing fixtures, when choosing a faucet handle.
With the right water flow control, you can easily and accurately regulate the temperature and flow of water in your home.
What Materials Used for Bathroom Faucets?
Bathroom faucets can be made from a variety of materials, including brass, stainless steel, bronze, copper, and even plastic.Each material has its own unique properties and benefits, and the best choice for a bathroom faucet will depend on the specific needs and preferences of the homeowner.
Brass
Brass is a popular choice for bathroom faucets because it is durable and resistant to corrosion. It is also relatively easy to work with, which makes it a cost-effective option for manufacturers.Stainless Steel
Stainless steel is another durable option for bathroom faucets. It is resistant to corrosion and staining, and it is easy to clean and maintain.Bronze
Bronze is a strong and durable material that is resistant to corrosion and tarnish. It is also relatively easy to work with, which makes it a popular choice for bathroom faucets.Copper
Copper is a soft, malleable metal that is known for its warm, golden color. It is resistant to corrosion and is easy to work with, which makes it a popular choice for bathroom faucets.Plastic
Plastic is a budget-friendly option for bathroom faucets. It is lightweight, easy to install, and easy to clean, but it may not be as durable as other materials.Brushed Nickel
Nickel faucets are a popular choice for homeowners due to their durability and sleek, modern look. These faucets are made from a blend of nickel and other metals, which gives them a shiny finish that is resistant to tarnishing and corrosion.They are also known for their smooth operation and ease of use, as the surface of the faucet is smooth and easy to clean.
There are several types of nickel faucets available on the market, including single-handle, double-handle, and touchless options.
These faucets are suitable for a variety of different applications, such as bathroom sinks, kitchen sinks, and even outdoor faucets.
In addition to their practical benefits, nickel faucets also add a touch of sophistication and style to any home.
Whether you are looking to update the look of your bathroom or kitchen, or simply want to add a touch of luxury to your home, a nickel faucet may be the perfect choice.
So, it is a good option for those who want a durable and stylish faucet for their home.
Chrome
Chrome faucets are a type of plumbing fixture that are commonly used in bathroom and kitchen sink applications.They are made of chrome-plated brass or other materials and feature a shiny, reflective finish that is resistant to tarnishing and corrosion.
Chrome faucets are popular because of their durability, ease of maintenance, and modern aesthetic appeal.
They can be found in a variety of styles, including single-handle, double-handle, and pull-out spray models, and are available in many different design options to suit a variety of decorating tastes.
Zinc
Zinc is a popular choice for faucets because it is relatively durable and resistant to corrosion.It may not have the shine of brass or chrome, but you can easily buy a zinc faucet coated in chrome for a more modern look.
If you're looking for a budget-friendly option that will still provide long-lasting performance, consider a zinc faucet for your next bathroom or kitchen upgrade.
Types of Repair Kits for Different Faucet Models
When it comes to repairing a faucet, the type of repair kit you need will depend on the make and model of your faucet. Some common types of repair kits include:Cartridge Repair Kits
These kits contain a new cartridge that can be used to replace a faulty one in a cartridge-style faucet.O-ring Repair Kits
O-ring kits contain a variety of sizes of O-rings that can be used to repair a faucet that is leaking at the base or handle.Stem Repair Kits
These kits contain a new stem and other parts that can be used to repair a stem-style faucet.Handle Repair Kits
These kits contain a new handle and other parts that can be used to repair a faucet with a handle that is loose or damaged.It's important to make sure you get the right repair kit for your faucet to ensure a successful repair.
If you're not sure what kind of kit you need, you can check the manufacturer's website or consult a professional plumber for guidance.
Disk Faucet Kits
A disk faucet kit is a type of repair kit specifically designed for repairing a disk faucet.These types of faucets use a disk-shaped valve to control the flow of water, and they are known for their durability and smooth operation.
However, like all faucets, they can eventually start to leak or become loose over time.
If you're experiencing these issues with your disk faucet, a disk faucet kit can help you repair it.
These kits typically contain a variety of parts that are specific to disk faucets, such as a new valve disk, O-rings, and mounting hardware.
By replacing the old parts with new ones, you can get your faucet working like new again.
To repair a disk faucet with a kit, you'll need to disassemble the faucet, replace the old parts with the new ones, and reassemble the faucet.
This can be a bit of a technical process, so if you're not comfortable with DIY plumbing repairs, it's a good idea to consult a professional plumber for assistance.
Ball Faucet Kit
A ball faucet kit is a type of repair kit specifically designed for repairing a ball faucet.These types of faucets use a ball-shaped valve to control the flow of water, and they are known for their durability and smooth operation.
However, like all faucets, they can eventually start to leak or become loose over time.
If you're experiencing these issues with your ball faucet, a ball faucet kit can help you repair it.
These kits typically contain a variety of parts that are specific to ball faucets, such as a new ball valve, seals, and a replacement spout.
By replacing the old parts with new ones, you can get your faucet working like new again.
To repair a ball faucet with a kit, you'll need to disassemble the faucet, replace the old parts with the new ones, and reassemble the faucet.
This can be a bit of a technical process, so if you're not comfortable with DIY plumbing repairs, it's a good idea to consult a professional plumber for assistance.
Essential Tools and Supplies for Faucet Repairs
When it comes to repairing a faucet, there are a few essential tools and supplies that you'll need to have on hand.These may vary slightly depending on the specific make and model of your faucet and the type of repair you need to perform, but in general, you'll need:
- A set of adjustable wrenches: These will be used to loosen and tighten nuts and bolts on the faucet.
- Pliers: Pliers can be useful for gripping and turning small parts, as well as for removing stubborn nuts and bolts.
- A basin wrench: A basin wrench is a specialized tool with a long handle and a swiveling head that is designed to reach into tight spaces, such as under a sink. It's useful for loosening and tightening nuts that are hard to reach with standard wrenches.
- A putty knife: A putty knife can be used to scrape away old sealant or putty around the base of the faucet.
- A replacement faucet cartridge or stem: Depending on the type of faucet you have, you may need to replace the cartridge or stem as part of the repair process.
- O-rings: These small rubber rings are used to seal connections and prevent leaks.
- Teflon tape: Teflon tape is used to wrap threads on plumbing connections to create a seal and prevent leaks.
- Faucet grease: Faucet grease is a special lubricant that is used to lubricate O-rings and other moving parts in a faucet.
It's a good idea to gather all of the necessary tools and supplies before you start the repair, as this will help ensure that you have everything you need to complete the job.
Ways to Clean a Leaky Faucet
Before replacing your faucet, try cleaning it to remove any gunk or debris that may be clogging up the parts of your sink.This can potentially save you money and extend the lifespan of your current faucet. If cleaning the faucet does not solve the issue, it may be necessary to invest in a new one.
Here are some 7 steps you can follow to clean a leaky faucet:
- Shut off the water supply: Before you start cleaning the faucet, make sure you shut off the water supply to the faucet. This will help prevent any accidents or further damage to the faucet.
- Remove the faucet handle: Depending on the type of faucet you have, you may need to use a flathead screwdriver or an Allen wrench to remove the faucet handle. Be careful not to damage the handle or the faucet as you remove it.
- Locate the faucet stem: The faucet stem is the part of the faucet that controls the flow of water. It is typically located underneath the sink.v
- Remove the faucet stem: Once you have located the faucet stem, use a crescent wrench or pliers to loosen and remove it. Be careful not to strip the stem or damage the faucet as you remove it.
- Clean the faucet stem: Once you have removed the faucet stem, use a cloth or toothbrush to clean any dirt, grime, or debris that may be stuck in it. You can also use a small amount of vinegar or lemon juice to help loosen and remove any stubborn grime.
- Replace the faucet stem: Once you have cleaned the faucet stem, place it back into the faucet and use a crescent wrench or pliers to tighten it. Be sure to not overtighten the stem, as this can cause further damage to the faucet.
- Reattach the faucet handle: Once you have replaced the faucet stem, reattach the faucet handle and turn the water supply back on. Test the faucet to make sure it is no longer leaking. If it is still leaking, you may need to replace the faucet stem or consult a plumber.
To learn how to access and potentially clean internal parts that may be causing clogs in your sink, continue reading for instructions on how to dismantle the sink.
Getting Started on the Faucet Repair

However, with a few tools and some basic knowledge, you can often fix a leaky faucet yourself. Here's a general overview of the steps you can take to repair a single handle faucet:
Shut Off The Water Supply To The Faucet.
This will typically involve turning off the valves under the sink or behind the wall where the pipes come into the room.Remove The Handle Of The Faucet
Depending on the model of your faucet, you may need to use a screwdriver to remove a screw that holds the handle in place, or you may need to pry off a decorative cap to access a mounting nut.Remove The Mounting Nut And Lift Off The Valve Stem
The mounting nut is located under the handle and holds the valve stem in place. Once you have removed the mounting nut, you should be able to lift the valve stem out of the faucet body.Inspect The Valve Seat And Replace If Necessary
The valve seat is a small, round piece of metal that the valve stem sits on. If the valve seat is worn or damaged, it can cause the faucet to leak. To replace the valve seat, you'll need a seat wrench, which is a specialized tool that fits over the seat and allows you to loosen or tighten it as needed.Replace The O-ring
The O-ring is a small, rubber ring that seals the valve stem to the faucet body. If the O-ring is damaged or missing, it can cause the faucet to leak. To replace the O-ring, you'll need to locate the one that fits your specific faucet model.Reassemble The Faucet
Once you have replaced any necessary parts, you can reassemble the faucet by reversing the steps you used to take it apart. Make sure to tighten all the mounting nuts and screws securely, but be careful not to overtighten them, as this can cause damage.Turn The Water Supply Back On And Test The Faucet
Once you have reassembled the faucet, you can turn the water supply back on and test the faucet to make sure it is no longer leaking. If the faucet is still leaking, you may need to repeat the process and inspect the parts more closely to find the source of the leak.Keep In Mind That Every Faucet Is Different, so you may need to adapt these steps slightly depending on the specific model you are working with. If you are unsure about how to proceed, it may be a good idea to consult the manufacturer's instructions or seek the help of a professional plumber.
Installing a New Ball Faucet Sink
To begin the process of installing a new faucet, gather the necessary tools and replacement parts.The specific installation instructions may vary depending on the type of faucet you are installing, so be sure to refer to the manufacturer's manual for guidance.
Once you have everything you need, you can start the installation process.
- Gather the necessary tools and materials. You will need a basin wrench, a pipe wrench, Teflon tape, and the replacement parts for your faucet.
- Turn off the water supply to your sink. Locate the shut-off valves under the sink and turn them clockwise to close them.
- Remove the old faucet. Use the basin wrench to loosen the mounting nuts that hold the faucet in place. Carefully lift the faucet off the sink and set it aside.
- Install the new faucet. Follow the manufacturer's instructions to attach the new faucet to the sink. Use Teflon tape on the threads of the mounting nuts to create a watertight seal.
- Attach the water supply lines to the faucet. Use the pipe wrench to tighten the connection points.
- Turn the water supply back on and test the faucet. Turn the shut-off valves counterclockwise to open them and allow water to flow through the faucet. Check for any leaks or issues with the faucet's operation.
- Make any necessary adjustments. If the faucet is not operating properly or there are leaks, tighten the connection points or make any other necessary adjustments as instructed in the manufacturer's manual.
Double-check Your Work
It is always a good idea to double-check your work before turning on the water supply to ensure that everything is properly installed and functioning correctly.Here are some specific things you should check before testing the faucet:
- Rubber seals: Make sure that the rubber seals are properly seated in their designated areas and are not damaged or worn.
- Valve stem: Check that the valve stem is securely attached to the faucet and is not loose or damaged.
- Shut-off valve: Confirm that the shut-off valve is fully closed and not leaking.
- Retainer clip: Ensure that the retainer clip is securely in place and holding the faucet in place.
- Connections: Check all connections between the faucet and the water supply lines to make sure they are secure and not leaking.
- Plumbing: Inspect the entire plumbing system to ensure that everything appears to be in working order.
Once you have checked all of these things, you can turn on the water supply and test the faucet to verify that it is functioning properly. If you notice any issues, make the necessary adjustments to fix them before using the faucet.
Installing a New Cartridge Sink
Great instructions! It's always a good idea to follow the manufacturer's instructions when installing a new cartridge sink, as the specific process may vary slightly based on the brand and model of the faucet.Here are a few additional tips to keep in mind when installing a new cartridge sink:
- Turn off the water supply to the faucet before you begin. This will prevent any water from coming out of the faucet while you're working on it.
- Use plumber's tape or a sealant on the threads of the mounting bolts to ensure a secure and watertight fit.
- When installing the new cartridge, make sure it's fully seated in the faucet body. It should be flush with the body and not sticking out.
- When attaching the handle, make sure it's securely fastened to the faucet body. Use a screwdriver to tighten the screw if necessary.
- After you turn the water back on, check for any leaks around the faucet and underneath the sink. If you notice any leaks, tighten the mounting bolts or replace any damaged seals.
- When you're finished, clean up any debris or tools that may have gotten dirty during the installation process.
By following these tips, you can ensure that your new cartridge sink is installed properly and functioning correctly.
Installing a Disc Faucet
Great, these are the general steps for installing a disc faucet. It's important to follow the manufacturer's instructions for your specific faucet model, as the process may vary slightly.Here are a few additional tips to consider:
- Make sure you have all the necessary tools and materials before starting the installation. This may include a basin wrench, adjustable pliers, Teflon tape, silicone sealant, and any mounting hardware that came with the faucet.
- Turn off the water supply to the sink before beginning the installation. This can usually be done by shutting off the valves under the sink or at the main water supply line.
- If you are replacing an existing faucet, remove the old faucet and any mounting hardware before installing the new one.
- Follow the manufacturer's instructions for attaching the water supply lines to the faucet shanks. These may require a special mounting nut or mounting plate.
- Make sure the faucet is tightened securely in place to prevent any leaks.
- Test the faucet by turning on the water supply and running the hot and cold water for several minutes to ensure everything is working properly.
- Check for any leaks around the base of the faucet or at the water supply connections. If you notice any leaks, tighten the connections or replace any damaged seals.
Installing a Shower Faucet

- Turn off the water supply to the shower. This can usually be done by shutting off the valves under the sink or at the main water supply line.
- Remove the old shower faucet by loosening the mounting nuts or screws that hold it in place.
- Clean the area around the shower faucet opening to ensure a proper seal when installing the new faucet.
- Follow the manufacturer's instructions for attaching the new faucet to the shower wall. This may involve attaching mounting plates or mounting brackets to the wall, and then attaching the faucet to these plates or brackets.
- Connect the water supply lines to the faucet using the mounting nuts or mounting plates provided. Make sure these connections are tightened securely to prevent any leaks.
- Attach the handles and any other components to the faucet, following the manufacturer's instructions.
- Turn the water supply back on and test the faucet to make sure it is working properly.
- Check for any leaks around the base of the faucet or at the water supply connections. If you notice any leaks, tighten the connections or replace any damaged seals.
It's important to follow the manufacturer's instructions for your specific faucet model, as the process may vary slightly.
If you are not comfortable with this type of work, it may be best to hire a professional plumber to handle the installation for you.
What to do After the Repair?
After completing a repair on a faucet or installing new faucets, it is important to properly clean and test the faucet to ensure that it is functioning properly.Here are a few steps to take after completing a faucet repair or installation:
Clean The Area Around The Faucet
Wipe down the sink and surrounding countertop to remove any debris or excess sealant.Test The Faucet
Turn the water on and off to make sure the faucet is functioning properly. Check for any leaks or drips.Check The Water Pressure
Test the water pressure to make sure it is at a normal level. If the pressure is too high or too low, you may need to adjust the water supply valve.Check For Any Remaining Leaks

Clean The Faucet
Use a soft cloth and mild soap to clean the faucet and remove any excess sealant or debris.Put Everything Back In Place
Replace the sink stopper, drain cover, and any other parts that were removed during the repair.It is also a good idea to keep a record of the repair, including the parts that were used and any steps taken during the repair process.
This can be helpful if you need to refer back to the repair in the future or if you need to show proof of the repair to a warranty provider.
Consider Remodeling
Bathroom remodeling can be a big undertaking, but it can also be a rewarding experience that results in a beautiful and functional space.Here are some things to consider when planning a bathroom remodel:
- Determine your budget: The cost of a bathroom remodel can vary widely, depending on the scope of the project. Determine how much you can afford to spend and stick to your budget as closely as possible.
- Decide on the scope of the project: Do you want to do a complete overhaul of the bathroom, or are you just looking to make a few updates? Determine what you want to achieve with the remodel and make a plan accordingly.
- Choose materials and finishes: Select materials and finishes that are durable, easy to clean, and suitable for the space. Consider the style of your home and choose materials and finishes that will complement it.
- Consider the layout: Think about how you use your bathroom and how you want it to function. Consider the layout and flow of the space and make changes as needed to improve functionality.
- Hire a professional: Unless you have experience with bathroom remodeling, it is recommended to hire a professional contractor to oversee the project. They will be able to help with the design, procurement of materials, and construction.
By taking the time to plan and carefully consider your options, you can create a bathroom that meets your needs and adds value to your home.
Resources
If you are experiencing a leaky bathroom faucet, you are in luck! There are many resources available to help you fix this issue. No matter the type of faucet you have, you can find guides and tutorials to help you repair it.Manufacturer's Website
Many faucet manufacturers have online resources available, including troubleshooting guides, installation instructions, and repair tutorials. Check the manufacturer's website to see if they have any specific information on repairing your particular faucet.Online Tutorial Videos
There are many online tutorial videos available that can walk you through the process of repairing a leaky faucet. These videos can be a great resource for visual learners and can be especially helpful if you are not familiar with the specific type of faucet you have.Home Improvement Websites
Websites like Home Depot, Lowe's, and others often have helpful resources available for repairing bathroom faucets. They may have step-by-step guides, videos, and other resources available to help you with the repair process.Hardware Store
Your local hardware store or plumbing supply store may have knowledgeable staff who can assist you with finding the right parts and providing guidance on how to repair your faucet.It is always a good idea to follow the manufacturer's instructions and use caution when working on plumbing projects.
If you are unsure of how to proceed or if you are uncomfortable attempting the repair on your own, it is best to consult a professional plumber.